How To Use the Audit Module
The Audit Module is a dedicated top-level page in AD Reports that lets you run multiple reports in a single batch using reusable Audit Profiles. It features a master/detail layout with a profiles list, reports-in-profile preview, and full-height result tabs — all with parallel execution (up to 4 reports concurrently) for 3–4× faster audits.
An Audit Profile is a reusable collection of reports that you can run together as a batch. AD Reports ships with seven built-in profiles (marked with a ★ star icon). You can also create your own custom profiles with any combination of reports from any category.
Built-in Audit Profiles
AD Reports includes seven ready-to-use audit profiles covering common audit scenarios:
| Profile Name | Reports | Description |
|---|---|---|
| ★ Quick Overview | ~10 | Executive summary — baseline inventory of users, groups, computers, and GPOs with key health indicators. |
| ★ Security Audit | ~18 | Full security posture review — privilege risks, delegation misconfigurations, Kerberoasting targets, Shadow Admins, LAPS coverage, and circular group nesting. |
| ★ Hygiene Check | ~15 | IT operations cleanup — stale accounts, inactive computers, empty groups, deep nesting, orphaned AdminSDHolder flags, and LAPS gaps. |
| ★ Compliance Report | ~16 | Auditor-ready compliance review — password policies, user rights assignments, delegation permissions, and LAPS coverage across all object types. |
| ★ User Lifecycle | ~12 | Account lifecycle review — new accounts, expiring accounts, inactive users, never-logged-on accounts, and disabled users ready for cleanup. |
| ★ Kerberos Attack Surface | 11 | Kerberos security audit — SPNs, constrained and resource-based constrained delegation, AS-REP Roasting targets, and accounts vulnerable to Kerberoasting. |
| ★ Legacy OS & Stale Systems | 12 | Legacy infrastructure audit — Windows XP/2003/Vista/2008/7/2012 systems, inactive computers, and LAPS coverage gaps. |
Open the Audit Page
Click Audit in the left navigation panel. The Audit page opens with a master/detail layout:
- Left panel (top) — Profiles list showing name, enabled report count, and last-run time
- Left panel (bottom) — Reports-in-profile tree preview, grouped by category with counts and bold category headers
- Right panel — Full-height result tabs area
Built-in profiles are marked with a ★ star prefix. The panel divider is draggable so you can adjust the left/right split to your preference.
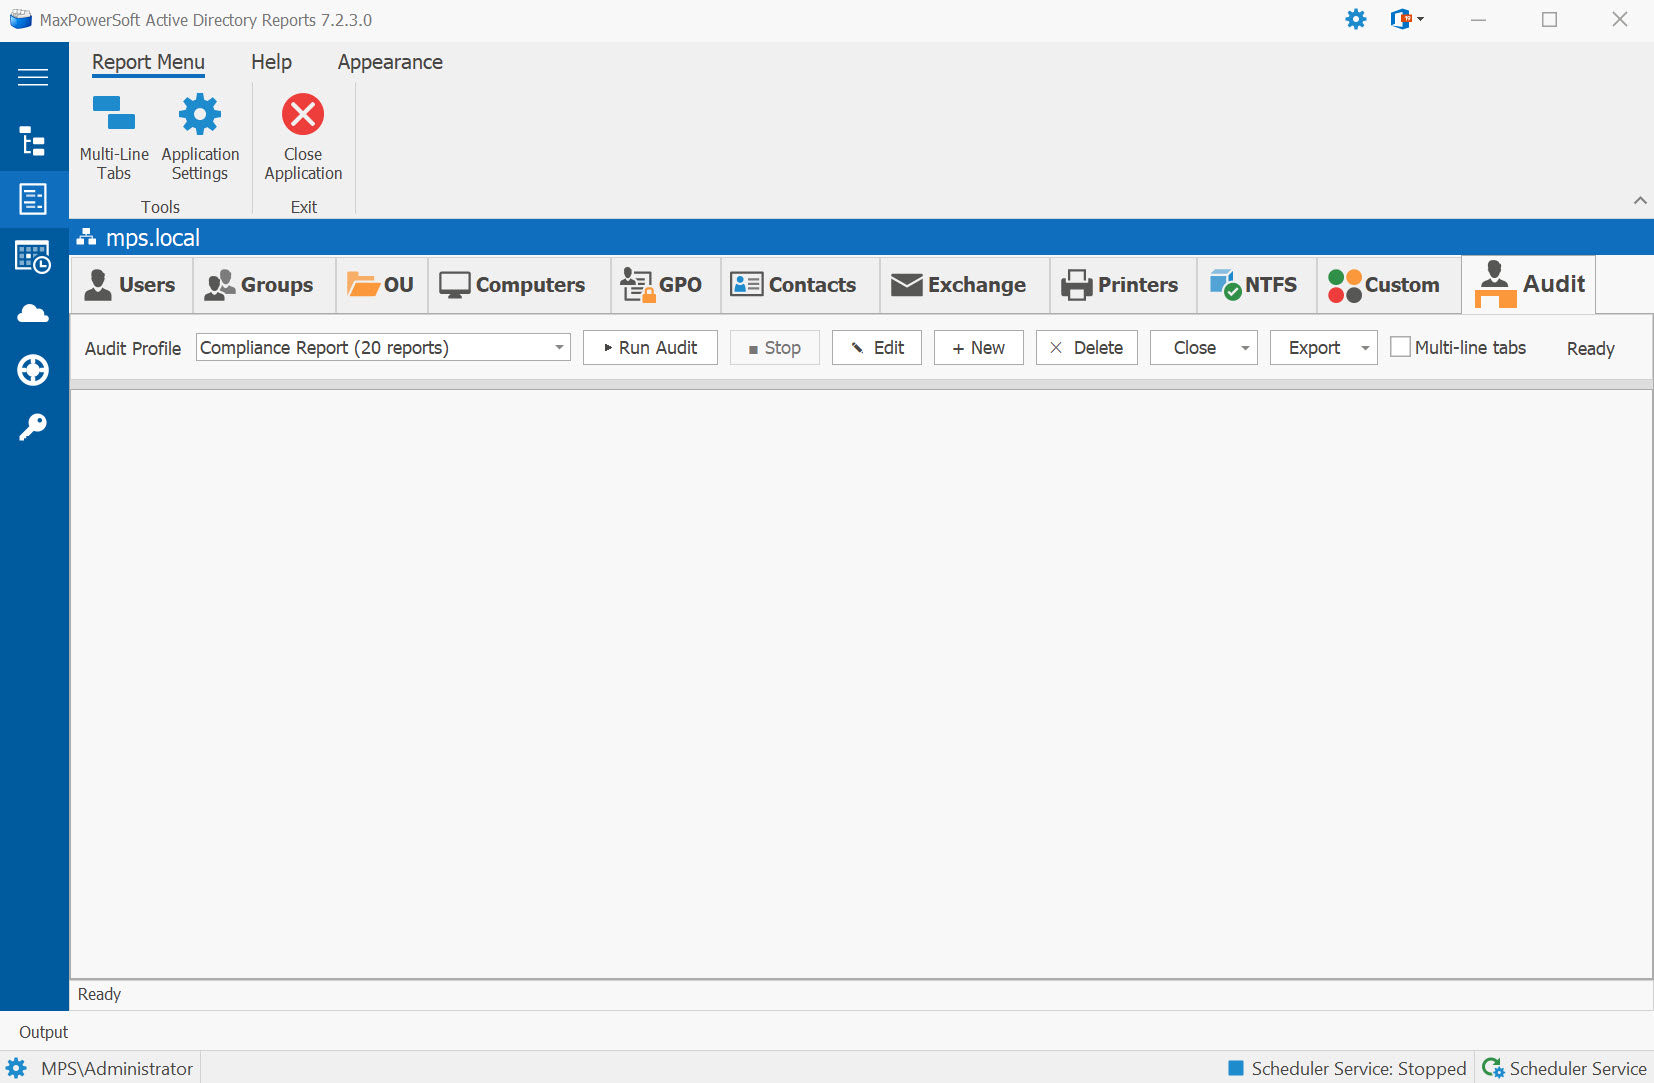
Run an Audit
Select a profile in the profiles list, then double-click it or click the Run button on the toolbar. You can also right-click a profile and choose Run from the context menu.
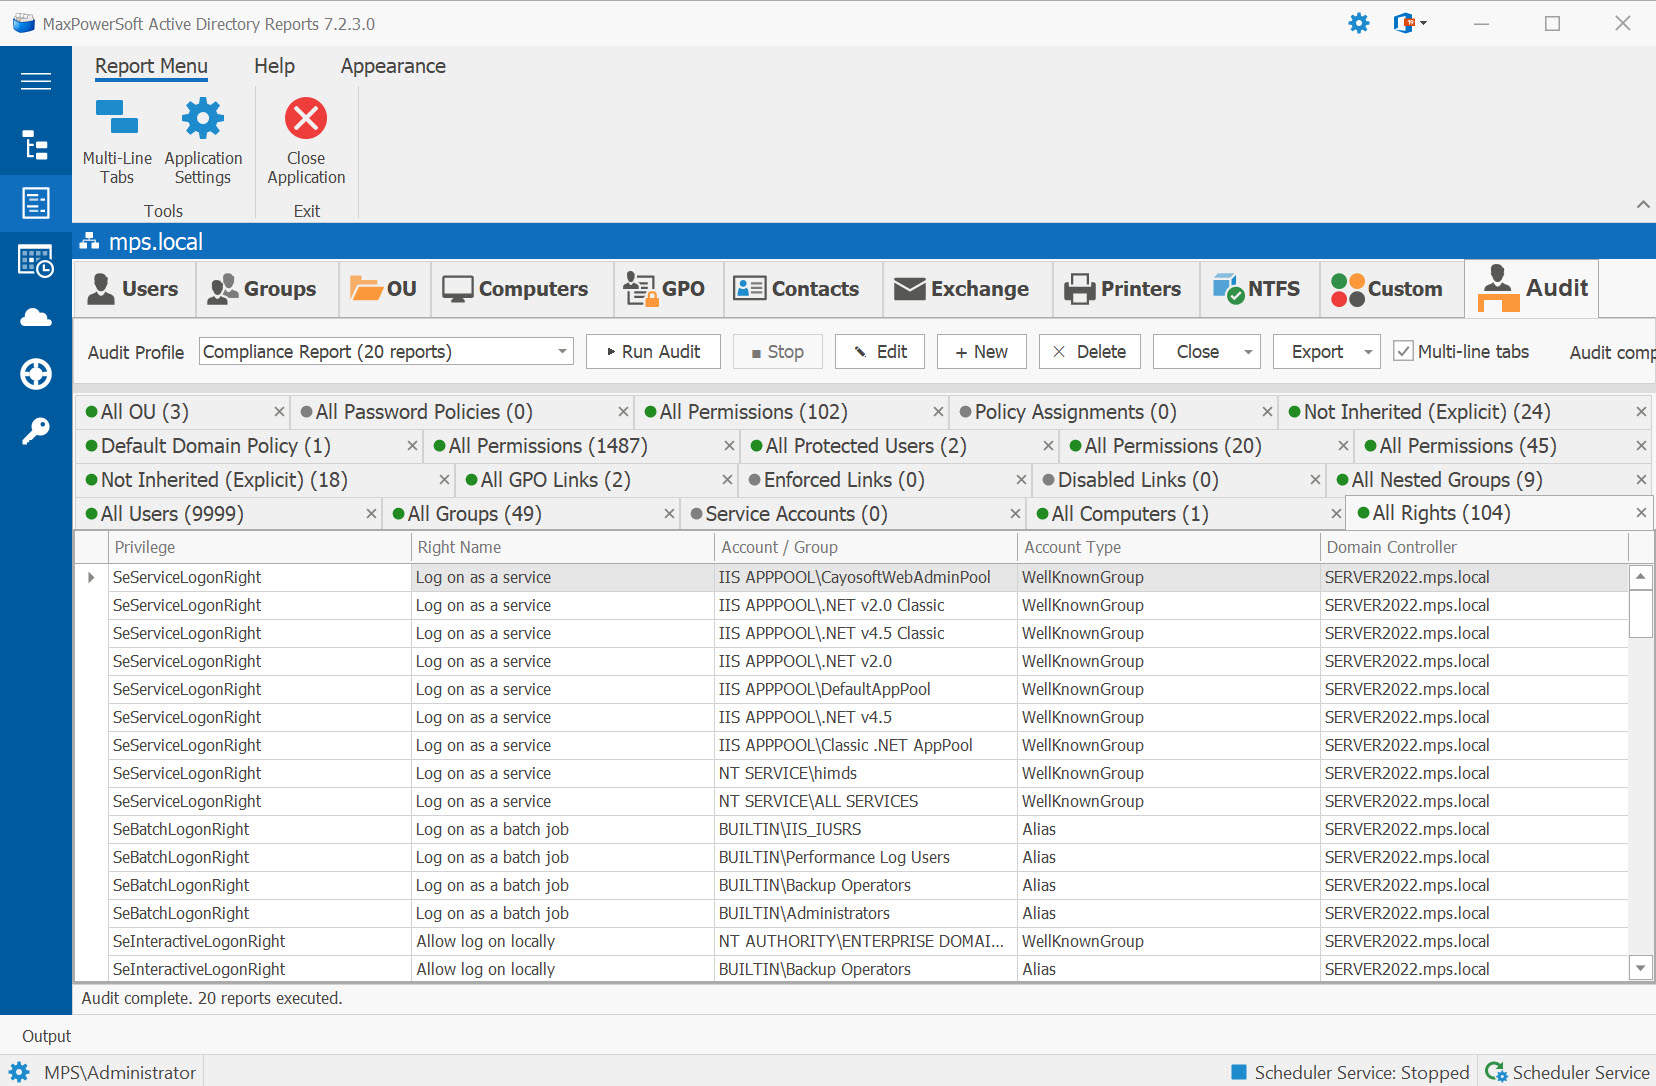
The audit runner executes up to 4 reports in parallel, providing 3–4× faster execution compared to sequential processing. A progress bar and status label show real-time progress. Result tabs appear as each report finishes, with color-coded status icons:
- • Green — report completed with results
- • Gray — report completed but returned no data
- • Red — report encountered an error
Result grids open with the Find Panel and Auto-Filter Row enabled for immediate searching and filtering.
You can cancel a running audit at any time by clicking the Stop button. Reports that have already completed will remain in their tabs.
Run or View a Single Report New in 7.5.1.3
You don't have to run an entire profile to look at one report. Click a single report in the profile's reports-in-profile list to open just that one:
- If the report has already been run in this session, its existing result opens instantly — no re-query.
- If it hasn't been run yet, only that one report runs, instead of the whole profile.
Run Audit is unchanged — it still executes the complete profile as before. This is purely a faster path when you want to check or re-check one specific finding without hunting through tabs.
Create and Edit Audit Profiles
To create a new profile, click the New button on the toolbar. To modify an existing profile, select it and click Edit, or right-click and choose Edit from the context menu.
In the Profile Editor you can:
- Set the profile Name and Description
- Browse the full report tree organized by category (Users, Groups, Computers, GPO, OU, Contacts)
- Check or uncheck individual reports to include or exclude them
- Review all selected reports in the Selected Reports panel on the right
- Use the Reset to Default button on built-in profiles to restore the original report selection
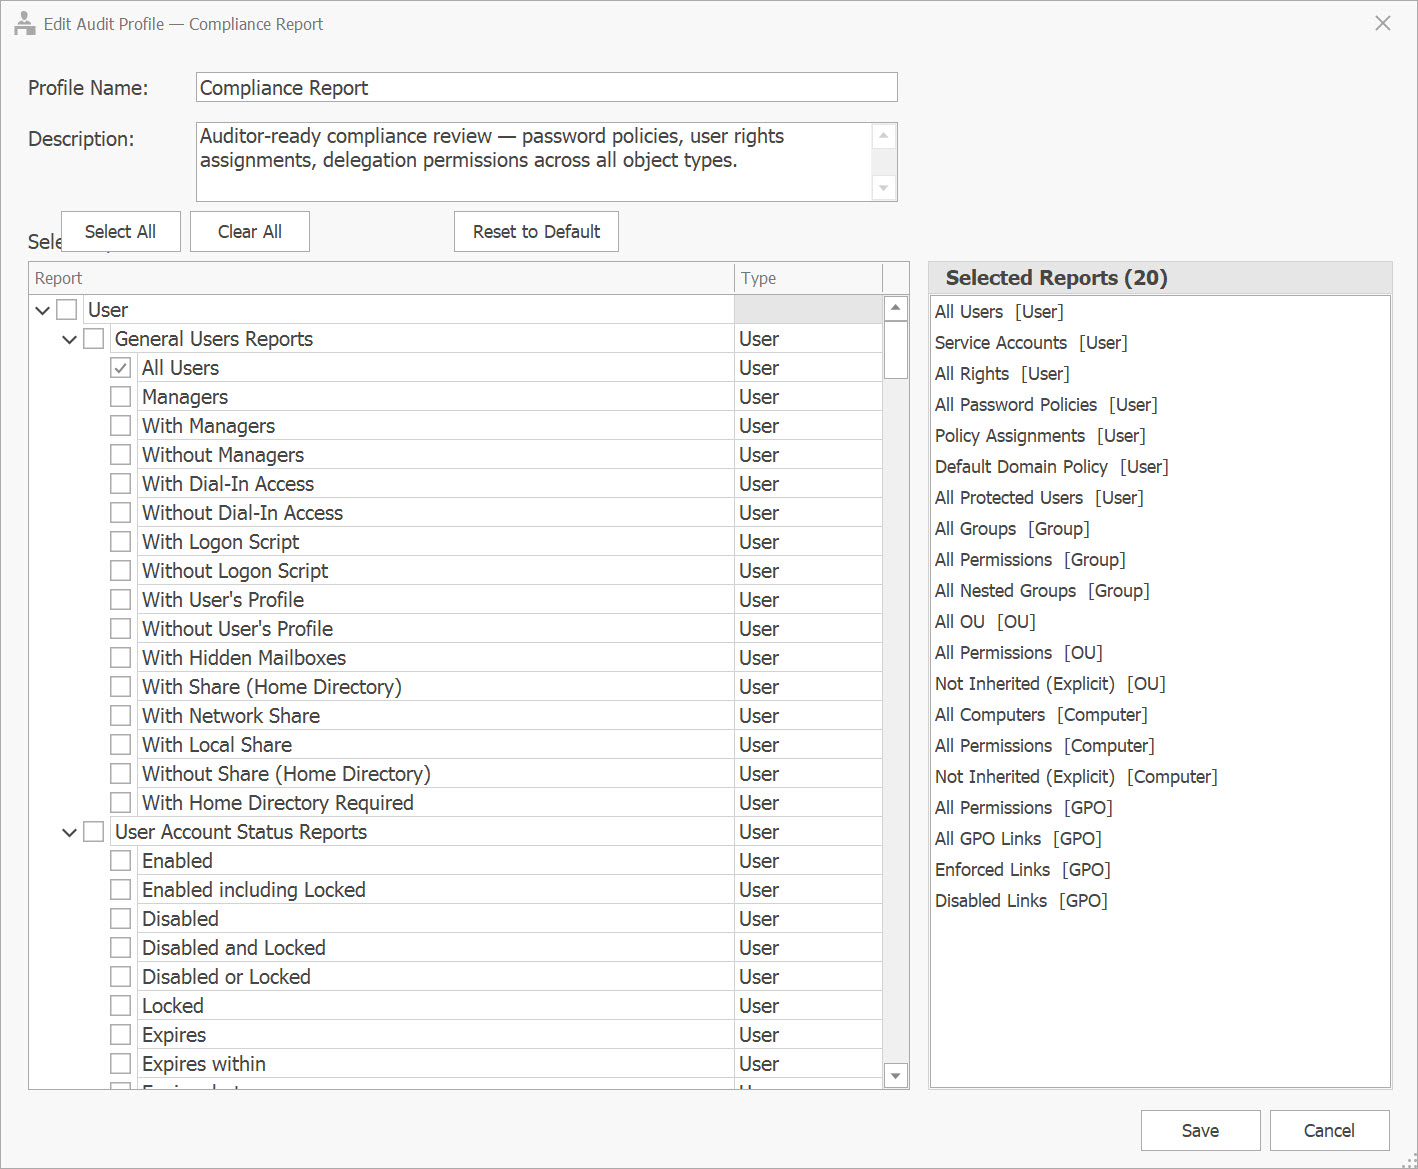
Click Save to save the profile. To delete a custom profile, right-click and choose Delete. Built-in profiles (marked with ★) cannot be deleted.
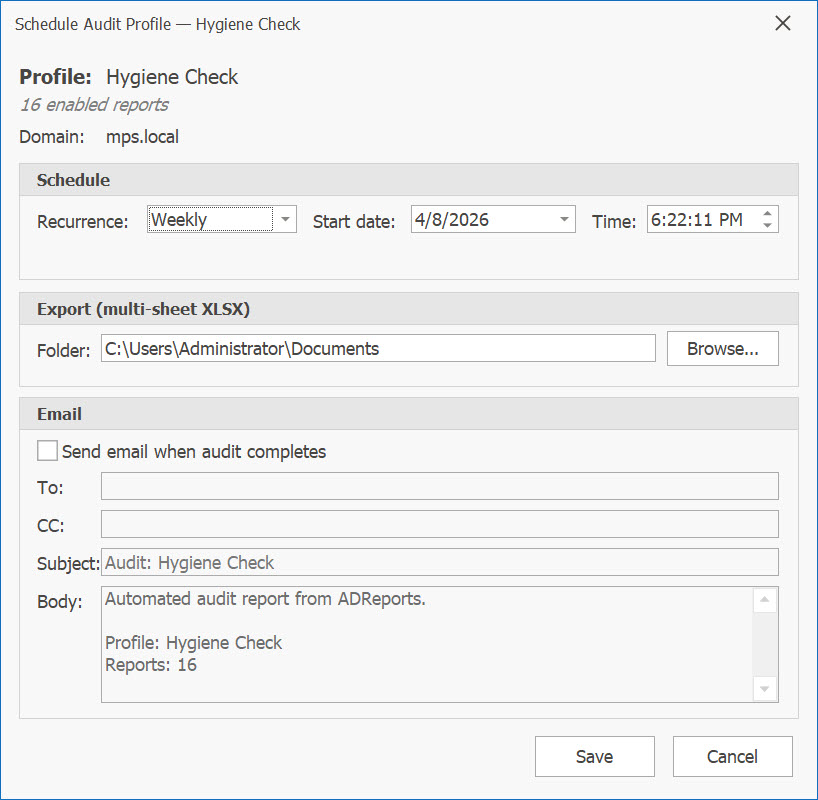
Schedule an Audit Profile
Any audit profile can be scheduled to run unattended and email the results. Click the Schedule button on the Audit toolbar (or right-click a profile and choose Schedule).
The Schedule dialog lets you configure:
- Recurrence — Once, Daily, Weekly, or Monthly
- Start date and time (defaults to now)
- Export folder — where the multi-sheet Excel workbook will be saved
- Email recipients — email addresses, subject, and body text
Visual Indicators
Scheduled profiles display visual markers on the Audit page:
- A clock icon prefix on the profile name in the list
- A toolbar label showing recurrence type and next run time (e.g., "Daily — Next: in 2d")
- Hover the label for full details including next absolute time and email recipients
Scheduler Calendar Integration
Audit schedules appear on the Scheduler Calendar in purple and are labeled as "Audit: {profile name}". Double-clicking an audit appointment on the calendar redirects you to the Audit page for editing.
Review Results and Close Tabs
After the audit completes, click any result tab to review the report data in a grid with search and auto-filter capabilities.
To clean up the results area, use the Close dropdown button:
- Close All — removes all result tabs
- Close Empty Reports — removes only tabs with zero results (gray icons)
- Close Error Reports — removes only tabs that encountered errors (red icons)
Export Audit Results
Use the Export dropdown button to export your audit results. Three options are available:
- Export Active Report to Excel — exports only the currently visible tab to a single
.xlsxfile - Export Active Report to CSV — exports the currently visible tab to a
.csvfile - Export All Reports to Excel (multi-sheet) — exports every open result tab into a single
.xlsxworkbook with each report as a separate worksheet
All exports include a timestamp suffix in the filename (e.g., SecurityAudit_20260408_143052.xlsx)
for easy organization and versioning.
